Connecting bluetooth audio device to Raspberry Pi
In this tutorial we are connecting bluetooth audio device to Raspberry Pi that is running Raspberry Pi OS and PulseAudio. This works with bluetooth speaker and headphones. What i have learned in the process that its important to do all the steps in the right order so that you don't get any errors. This tutorial is tested with the Raspberry Pi 3/4 and Raspberry Pi OS Lite (32bit) that is released in 2020-12-02.
Connect Raspberry Pi to bluetooth speaker
1. Connect to your Raspberry Pi over SSH using terminal software like PuTTy, or if you are using desktop version of Raspberry Pi OS then you have to open Raspberry menu and go to Raspberry Menu > Accessories > Terminal.
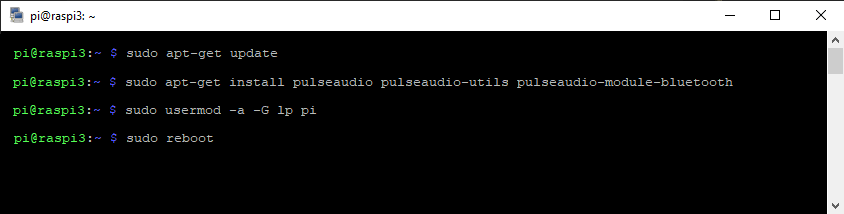
2. Let's start by updating package repositories by writing sudo apt-get update and hit enter.
3. Install pulseaudio and needed modules to Rasperry Pi OS. You have now two options to choose from. You can go with the option a that doesn't install all the modules and takes 164 MB less space, or you can ago with option b, where you install all the extra modules. There has been cases where users had to install all the modules (Option b), because they couldn't pinpoint what was the missing module.
Option a. sudo apt-get install pulseaudio pulseaudio-utils pulseaudio-module-bluetooth
(After this operation, 676 MB of additional disk space will be used.)
Option b. sudo apt-get install pulseaudio*
(After this operation, 840 MB of additional disk space will be used.)
4. Next we need to add user pi to group lp: sudo usermod -a -G lp pi. If you are not doing this, you will get "Failed to connect: org.bluez.Error.Failed" -error while connecting to device with bluetoothctl.
5. Reboot Raspberry Pi with this command: sudo reboot. You need to reboot so that the group change comes into effect. Closing and reconnecting with PuTTy wasn't enough for me, but reboot worked.
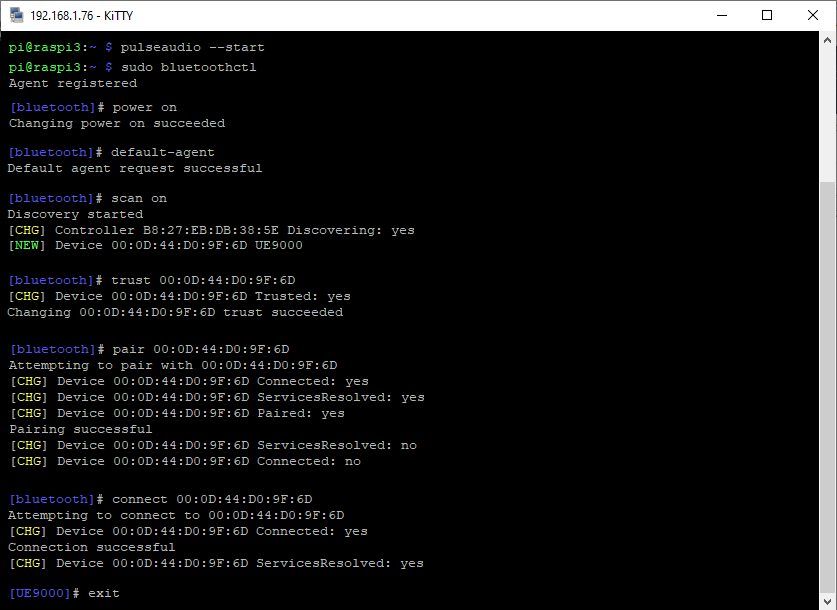
6. Next start pulseaudio with command: pulseaudio --start
7. Let's access bluetooth using: sudo bluetoothctl
8. Power on bluetooth by writing: power on and then select default agent: default-agent.
9. Start your headphones/speaker and put it in the pairing mode. Then start scanning the devices with: scan on. Wait untill you see your device in the scan list, and then add that device to trusted list with command: trust xx:xx:xx:xx. After that, pair Raspberry Pi with: pair xx:xx:xx:xx, and then connect with: connect xx:xx:xx:xx.
10. If you did everything in right order you should be now connected to your bluetooth device. If thats the case, exit bluetoohctl with command: exit
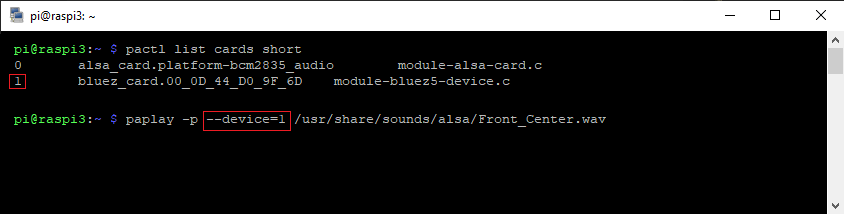
11. Check that your newly connected audio device is showing in the audio card list with: pactl list cards short. Sometimes there is small delay untill your bluetooth device is showing, so you might have to run the command multiple times. If you want more info about the available cards just write the command without short pactl list cards.
12. When you see your audio device in the list, you can test that the device is working. Check the number of the card with the previous command and use that number with this command by replacing the --device id.
paplay -p --device=1 /usr/share/sounds/alsa/Front_Center.wav
13. If you are hearing sound, then everything is working like it should!
Make Raspberry Pi to connect bluetooth automatically on boot
There might be situations where you want Raspberry Pi to connect to your bluetooth device automatically on boot, so let's also cover that up. We are going to use simple crontab approach. Here is the reasons why you shouldn't run PulseAudio as system mode: What is wrong with system mode?
1. First we need to create bash script. I'm creating the file to /home/pi with command touch btconnect.sh
2. Next we need to change the file permission so that we can run it chmod +x btconnect.sh
3. Then we can open the file for editing. I'm using nano for editing. nano btconnect.sh. Copy&paste or write the lines below to the sh file. Replace the XX with the address of your bluetooth device, so that Raspberry Pi will attempt to connect to that specifig device on boot. Optionally you don't have to add the bluetoohctl lines at all, then Raspberry Pi doesn't connect to your device, but when you start your speaker/headset it will automatically connect to Raspberry.
#!/bin/bash
pulseaudio --start
bluetoothctl power on
bluetoothctl connect XX:XX:XX:XX
You can paste text to shell by right clicking your mouse in PuTTy. You can also copy text in shell just by highlighting text with left click.
4. Then you can save the file by pressing [Ctrl] + X then y and then [Enter].
5. Now we can test that the script works by writing ./btconnect.sh. If you don't get any errors, then you can add the script to crontab.
6. Write crontab -e and add line @reboot /home/pi/btconnect.sh. If you are using nano for editing then you can save and exit by pressing [Ctrl] + X then y and then [Enter].
7. Reboot your Raspberry Pi to see if it works. You can reboot by writing sudo reboot. If you did everything right, Rasperry should automatically connect to your speaker/headphones, and if you power off your audio device and start it again, it should automatically connect to Raspberry, so it works both ways.
Troubleshooting
pa_context_connect() failed: Connection refused
You might get "Connection failure: Connection refused, pa_context_connect() failed: Connection refused" -messages when entering pactl list cards command. You can try to fix that by first killing pulseaudio process by writing pulseaudio -k and then starting it again by writing pulseaudio --start.
Failed to connect: org.bluez.Error.Failed
This is the most commonly seen error, and the problem is that it doesn't tell you anything specific. You will get this error if: You don't have all necessary modules, or if pulseaudio is not started, or if your user doesn't have permission to use bluetooth.
1. Run this command pulseaudio --dump-modules to see all the available modules for PulseAudio. Make sure that you find these modules from the list: module-bluetooth-policy, module-bluetooth-discover, module-bluez5-discover. If you don't have these modules installed, then you can just run sudo apt-get install pulseaudio* to install all the available modules.
2. Run this command pactl list short modules to see all the currently loaded modules for PulseAudio. Make sure that you find the modules mentioned on step 1. If you don't find them, then check PulseAudio config with sudo nano /etc/pulse/default.pa and see if there is commented lines that contains these modules. If you don't find this modules at all from this file, then you can try to manually add them to file.
3. Make sure that you added your user to lp group and rebooted Raspberry like mentioned in step 4.
4. You can check errors from systemlog by writing sudo cat /var/log/syslog | grep -i protocol and bluetooth errors by writing systemctl status bluetooth.
3 Comments